Phocas Rebates allows you to calculate and manage the various types of rebates you pay and receive, using the information in a Phocas database. Typically, 'payable' rebates are based on a sales database and 'receivable' rebates on a purchasing database, although some users will have a 'sales and purchasing' database.
| Table of Contents | ||||||
|---|---|---|---|---|---|---|
|
Related topics
 Note about database access
To be able to create, edit or view a project, you need to have access to the source database in Phocas. Any restriction applied in Phocas also applies to Rebates.
Getting started
Rebates are managed via a series of 'projects', allowing you to set up multiple rebates in relation to one database and separate projects for different databases. For example, you might have a project for payable rebates (connected to a sales database), and a separate project for receivable rebates (connected to your purchasing database). Or you might set up a project for each company you deal with, and within those projects have a number of different rebates. You can have as many projects and rebates as required to best meet the needs of your supply chain.
When you open Rebates you see the Projects home screen, listing any projects that have been created. From here you can create or delete rebate projects. You can also select the Rebates menu to access and create projects.
Create a rebates project
To create a new project, either select New on the Projects home screen (pictured above) or select the Rebates menu > New project.
Enter a project name (required) and description. Select a database from the list to use for your rebates calculations (you will see all available Phocas databases in this dropdown). Save.
Once you save the new project, the Projects home screen automatically opens. Select the project to re-open the setup screen.
Project setup screen
This is where you enable rebates and set some basic defaults such as calculation stream and measures. The screen is divided into several sections:
| Table of Content Zone | ||||||||
|---|---|---|---|---|---|---|---|---|
| ||||||||
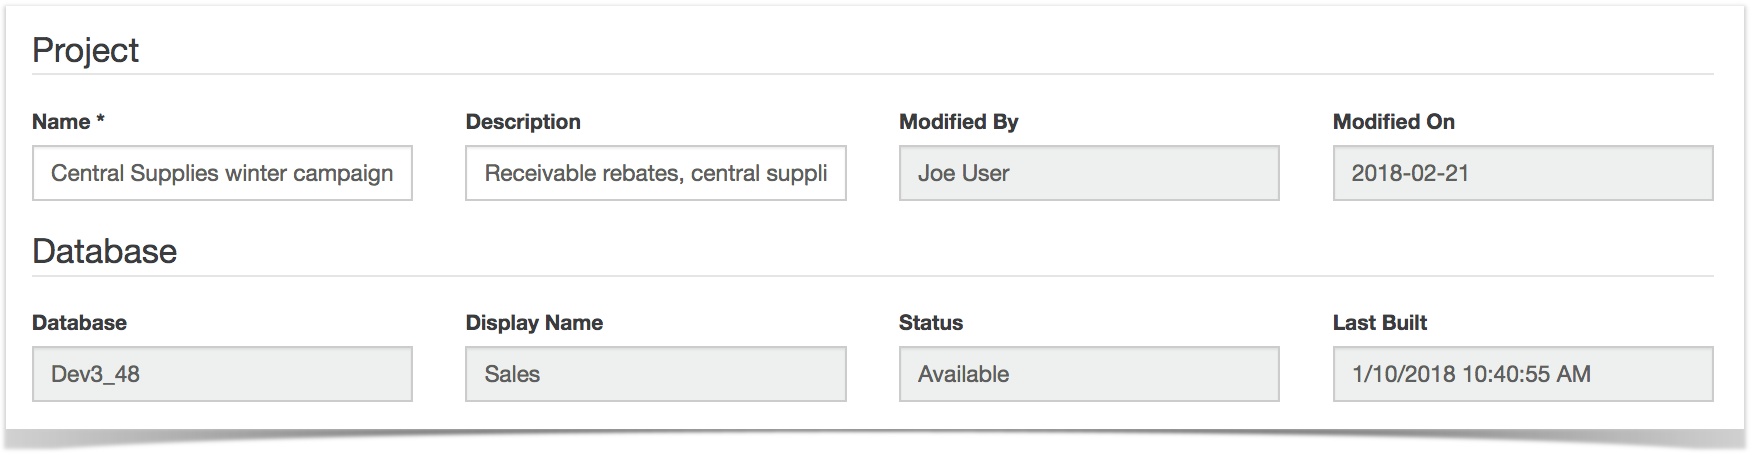
Project informationThe overview section, displaying information about the project, including details of the project's most recent changes. You can change the name and description but the other fields are read-only. Source database informationRead-only information about the project's source database is displayed: name, display name, status and last built date and time.
'Receivable'/'Payable'The setup options here for Payable and Receivable are the same, with a section for each:
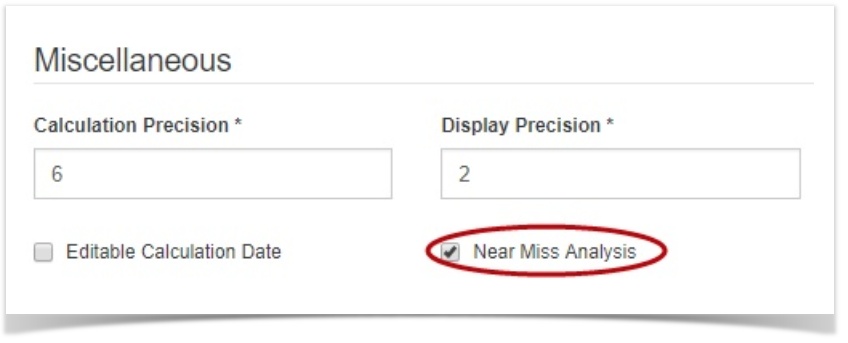
'Miscellaneous'
GroupsYou can group rebates within a project for ease of management. See 590313. Save the project. You'll now see the home screen for this project. From here you can view rebates relating to this project, create, clone and delete rebates and run and post transactions |

View all projects
Select the Rebates menu to access and manage projects.
With the list of projects displayed, select a project to open or search for a project. You can choose see All projects or create a New project.
Edit a project
Select the project you want to edit from the projects list, then choose Setup. This allows to you change any detail apart from database.
Delete a project
To delete a project choose All projects. Select a project and choose Delete. This deletes any rebates in that project. You can only delete one project at a time.
Create a rebate
All rebates need to belong to a project. This means you need to be 'in' a project to create a rebate.
Select and open the relevant project in which to create your rebate. The Rebates tab will be selected by default. If there are already rebates associated with a project, they will display here. You can filter by active/non active, by group and by whether a rebate is a 'parent' (the default view is non parent). From this screen you can also edit or delete a rebate (note that deleting a rebate can't be reversed).
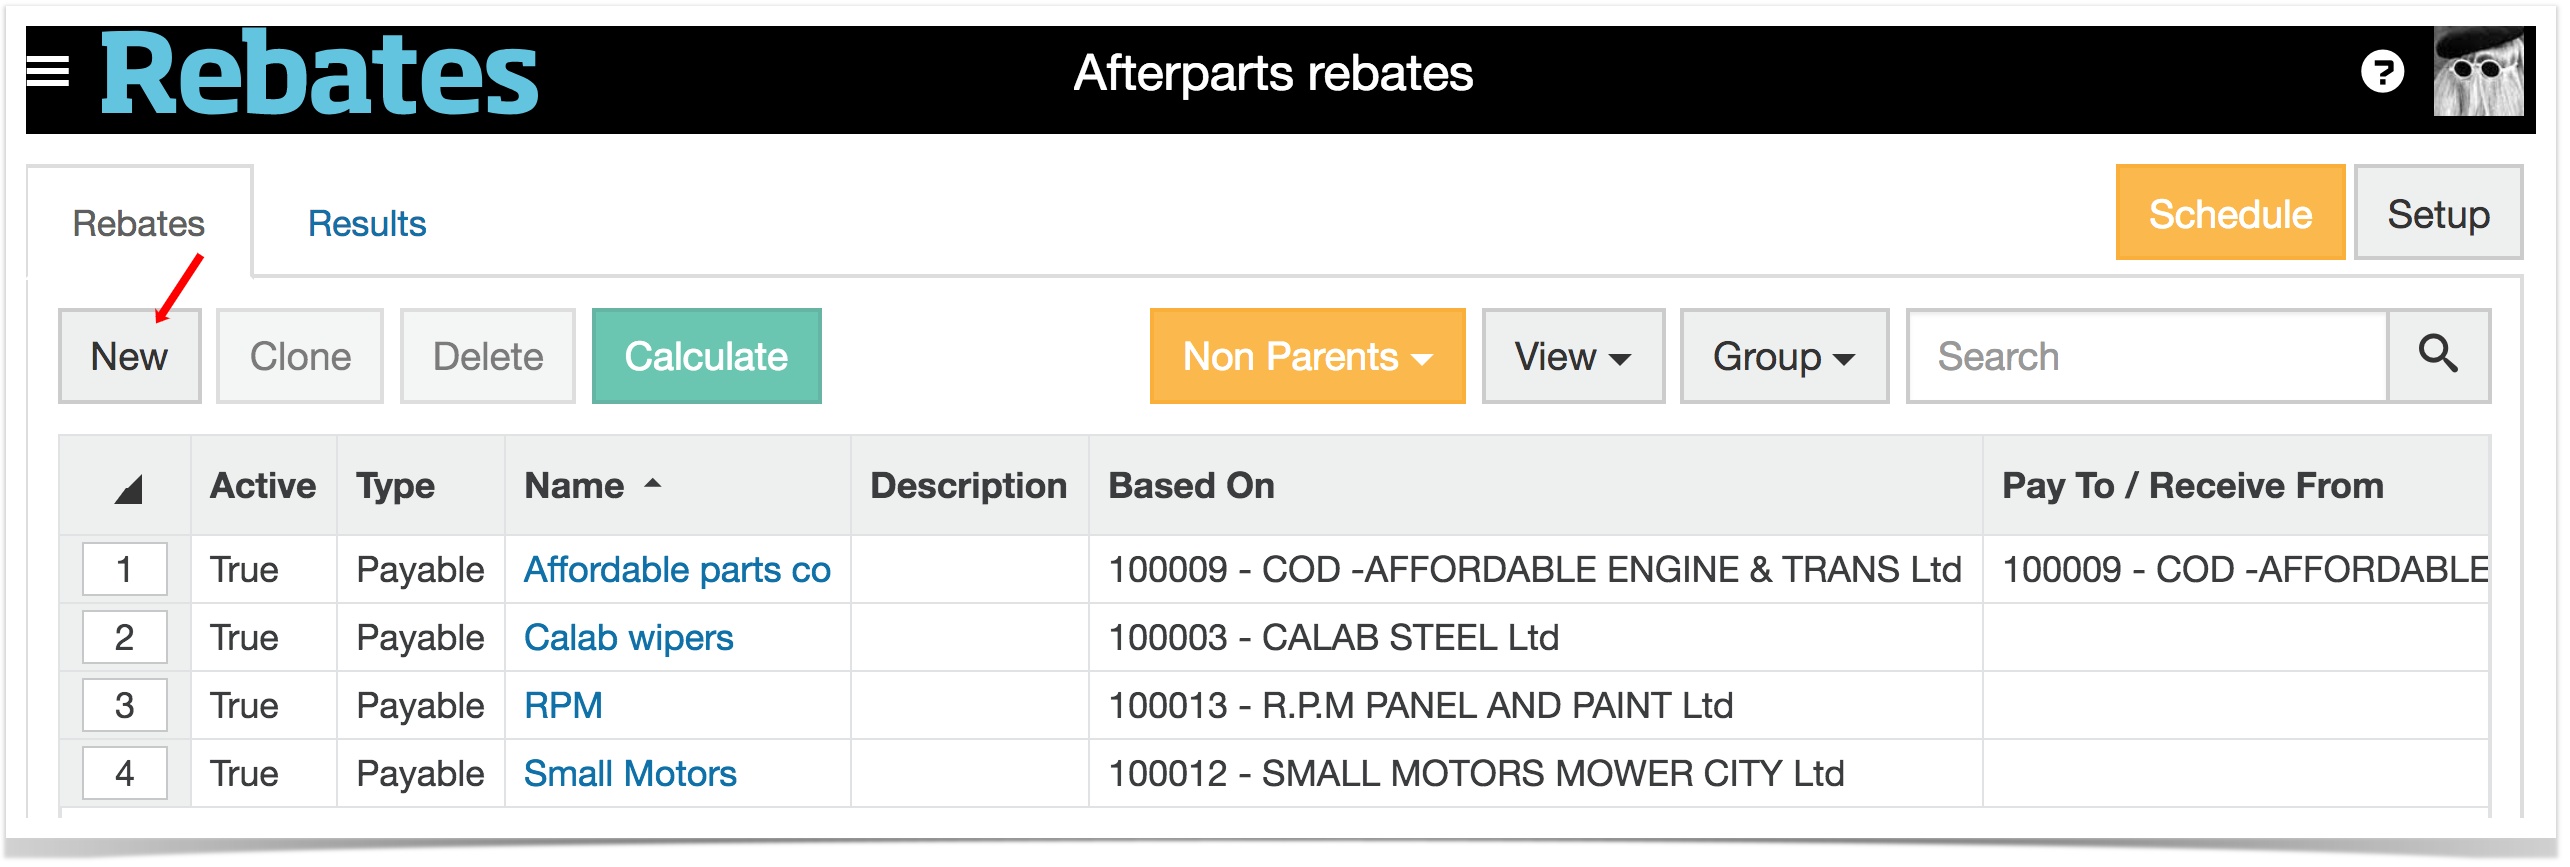
Select New or select a rebate to clone.
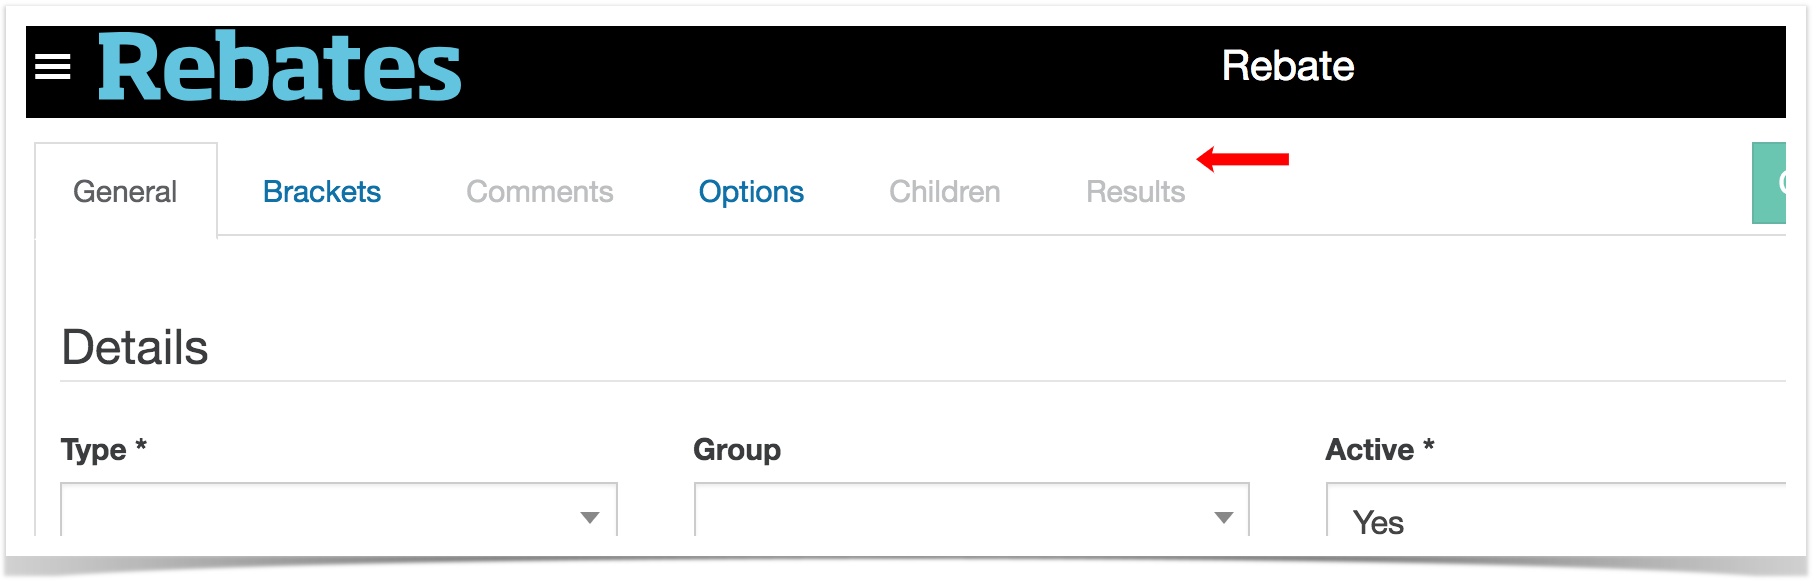
The rebate screen that opens has a number of tabs (as shown below). Note that some tabs only become available once the rebate has been saved.
| Table of Content Zone | ||||||||
|---|---|---|---|---|---|---|---|---|
| ||||||||
'General' tab
In the image below, the 'Ship to' dimension and the customer 'Ace Training Services' are selected.
Select New under either 'Include' or Exclude', depending on which type of restriction you want to apply. Select a dimension by which to filter the rebate, and an entity. Repeat to include (or exclude) multiple entities. Once you finish with the 'General' tab, move onto 'Brackets'. If you try to save before changing tabs, you will be taken straight to the brackets tab. 'Brackets' tab
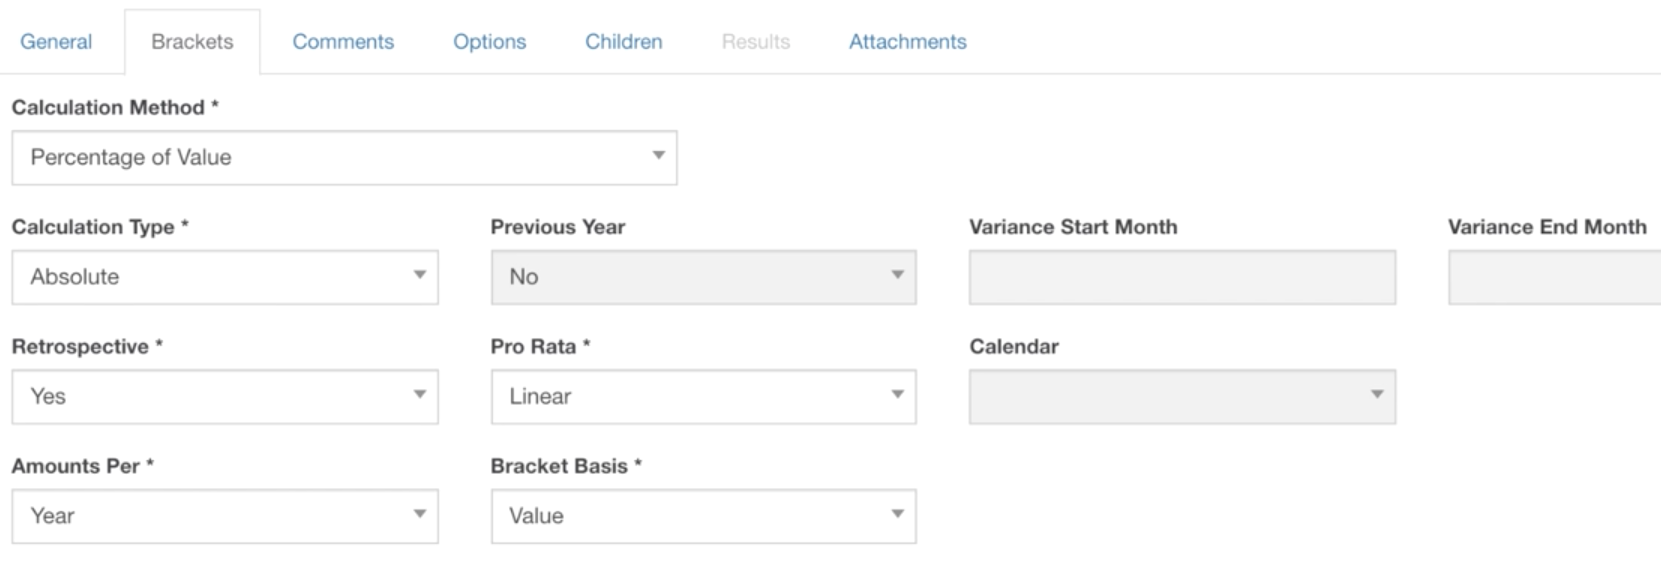
Before you create the brackets for a rebate you need to set some basic bracket conditions. Calculation method. Options are:
Calculation type. You'll only need to change this from the default (absolute) is you are creating a growth rebate. Growth rebate settings. The default variance period is the same period in the previous year, with Previous Year set 'yes''. To change this, set Previous Year to 'No' and select a start and end month for your variance period. Retrospective. With Retrospective set to 'Yes', Rebates applies the highest relevant bracket to the entire transaction amount (this result appears as an additional row when you run a calculation for this rebate). E.g., If brackets were set up so that $0 - $5,000 resulted in 2% and $5,000 - $10,000 in 3%, and the customer has spent $7,000, results would be as follows:
Pro rata. This option allows you to see how your rebates are likely to track for a year when you are only part-way through the year. It does this by multiplying your actual results by the number required to 'make' 12 months, applies brackets accordingly and calculates the results. The pro rata option becomes available only if bracket period is 'Yearly' and Retrospective is selected. Set whether the rebate is calculated on results per month or yearly. Note re 'month': The calculation treats a collection of months as a single period, rather than as individual months, e.g., to get results from a quarter you could set the transaction period from January to March. Bracket basis. Select the measure on which the bracket will be based (e.g., 'quantity' if you want the bracket based on selling a number of something, such as 1000 to 10001 units). Brackets are typically based on cost, quantity or value. Growth rebateSet the calculation type to 'Growth'. Choose 'Previous year' or set start and end months for a variance period.
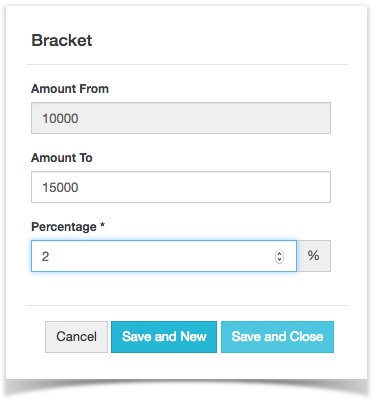
Create brackets
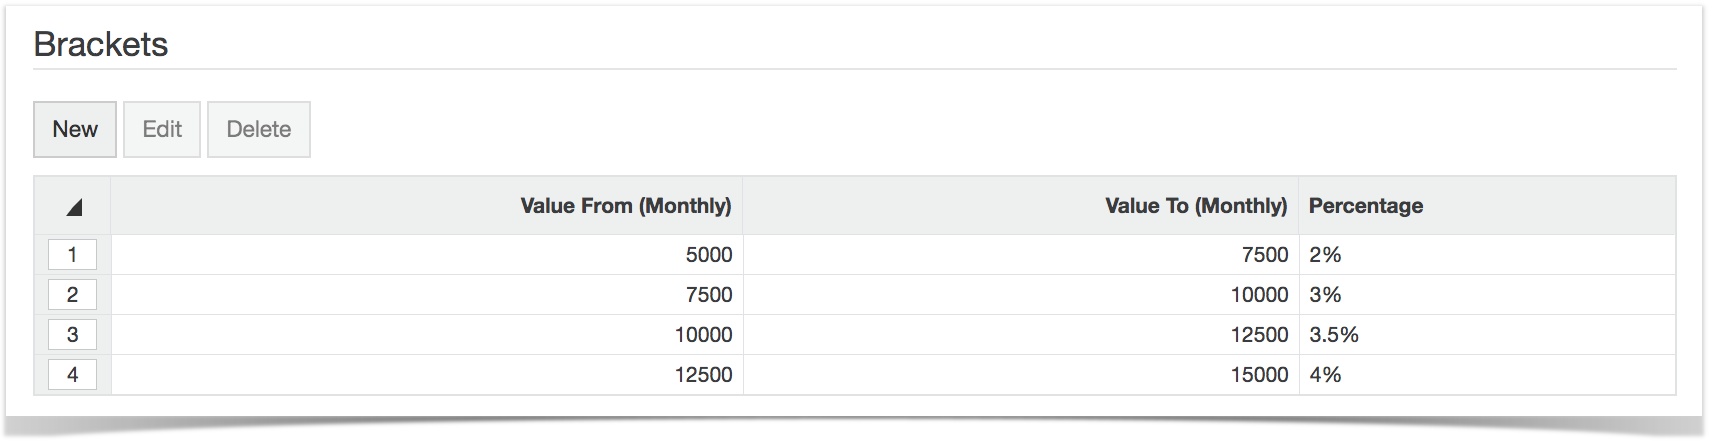
To save time when creating multiple brackets, choose Save and New. If you're finished Save and Close. Note. You can edit a bracket later, but can only change the rebate rate/amount and not the 'Amount from' or 'Amount to', i.e, the bracket range. It is common to have a tiered schedule of rates for a rebate, as shown in the image below (here the overall range is $0 to $30,000 and there are 4 brackets, each assigned a different rebate amount).
Note about changing the calculation method. If you try to change the calculation method after you have set up brackets for a rebate you will get a warning. You can proceed but you will need to create new brackets for this rebate. How individual transactions can affect bracketsIf a transaction spans two brackets, the transaction is effectively 'split' and the lower rate is applied to the portion within the first bracket, and the higher rate to the portion that crossed into the higher bracket. For example, looking at the image above, if total transactions were approaching the 'amount to' of 10000 (i.e.,the running total stood at $9500) and a new transaction for $700 was processed, taking the total to $10,200, the lower rate is applied to the amount within the first bracket ($500), and the higher rate to the amount that crossed into the higher bracket ($200). Deleting a bracketSelect the bracket and delete. You will be asked to confirm, as deleting cant be undone. Once a bracket is deleted, the remaining brackets automatically adjust to cover any gaps. To delete multiple brackets, select and delete. |

Options tab
Although this section doesn't affect the calculation of the rebate, the extra information can be useful, e.g., displaying who a rebate is paid to (or received from) and how often. This information can be updated without making any difference to the rebate results.
Payment frequency (select from monthly, quarterly, half yearly, yearly or other). This does not affect the bracket period you selected on the 'Brackets' tab.
Customer and entity (select from the dropdown). Your selections here do not affect the 'based on' selections you made on the 'General tab'.
Audit (read only - who created and last modified the rebate and when).
Children tab
The 'Children' tab lists any child rebates associated with a rebate.
| Insert excerpt | ||||||
|---|---|---|---|---|---|---|
|
Attachments
You can attach and documents relevant to a rebate via the Attachments tab.
Running calculations
To see the financial impact of individual or multiple rebates you can run a calculation based on transactions for a specific period. You can run a calculation as often as required, e.g., daily or weekly, and each time you run a calculation, it replaces the previous results.
You can post the results e.g., at the end of a quarter, at the end of a campaign, annually, etc (a bit like a sign-off). This keeps a permanent record of the transactions, which can be fed into a Rebates analysis database in Phocas.
You can run a calculation from the following places:
- a list of rebates (the Project screen)
- an individual rebate screen
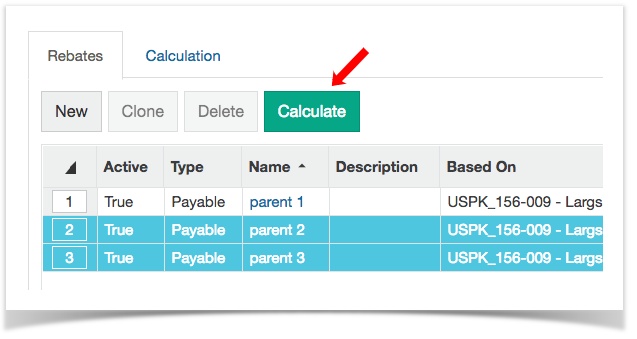
Running a calculation from a rebate list
- From within a project, select one or more rebates and click Calculate. You can filter by group to more easily find a rebate, or to remove inactive rebates from view.
- The 'Calculate' dialog may already be populated with the last calculation information for this Rebate project or the fields may be empty. Simply update the information as required. All fields are mandatory.
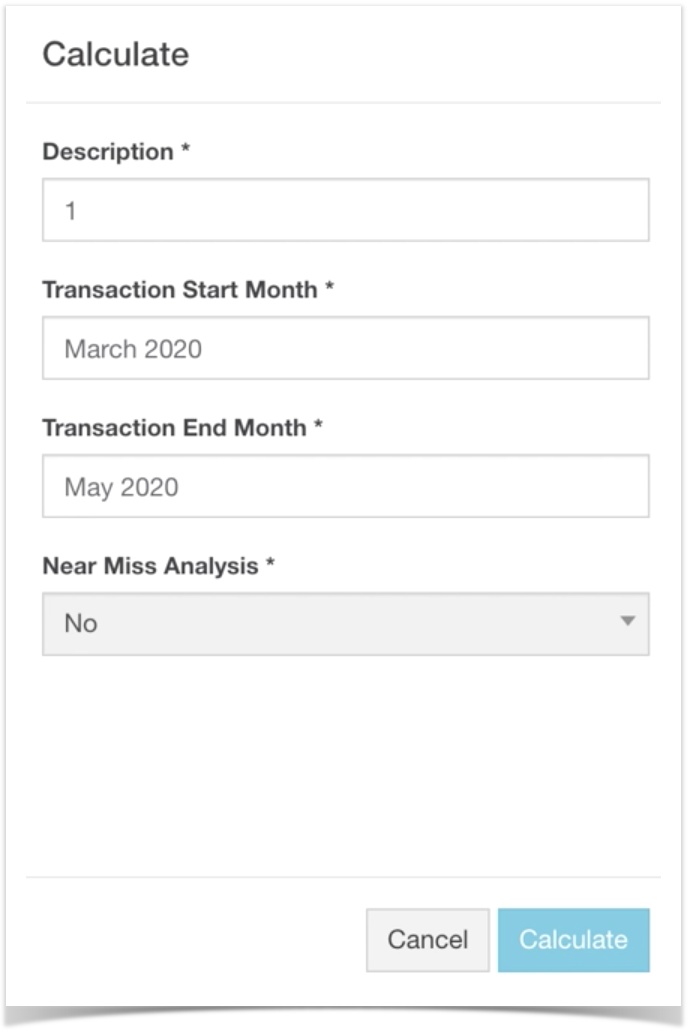
- Give the calculation a description.
- Set the start and end months for the period you want to include in the calculation. Note re 'monthly' bracket period. The calculation treats a collection of months as a single period, rather than as individual months, e.g., to get results from a quarter you could set the transaction period from January to March.
- Select whether you want to include near miss analysis.
- Calculate.
- Rebates that are valid for a portion of the calculation period (i.e., the period defined by the transaction start and end months) are calculated only for that portion. E.g., if you have a rebate that is valid from June to December and you run a calculation based on transactions over May to August, then only the portion relating to July/August will be calculated.
- If your calculation includes rebates in this category, a confirmation screen will appear listing these rebates and asking whether you want to proceed. If at this stage you want to revise the rebates, choose 'No' and change the transaction start and/or end months.
- You can return to the projects screen while the calculation is running.
- Note for users with older versions of Phocas Rebates: If your version of Phocas Rebates is older than 8.0.14 the calculations box will also contain 'Calculation date' field. This is often greyed out, unless it was set as editable during project setup.
Viewing results
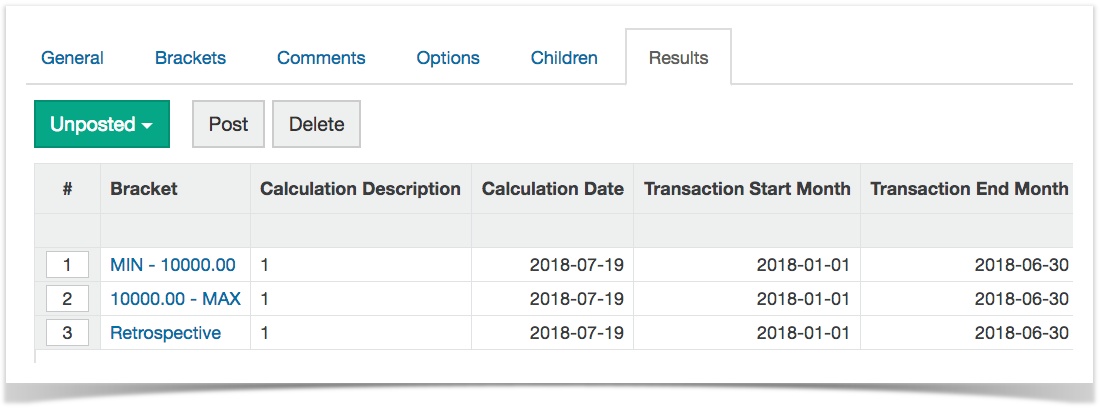
- Once the calculation is completed, the dialog closes and the Results tab for the project opens, with a success or failure message displaying.
- The view on the results screen is automatically filtered by 'unposted'.
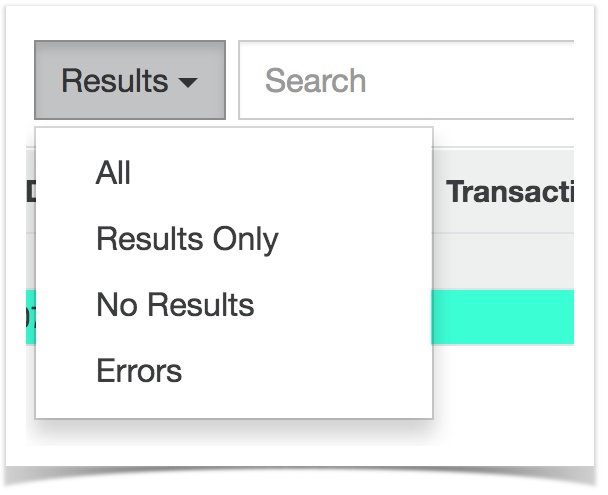
- You can also use the Results filter (near the search box) to narrow your view, or search for a rebate.
- Calculations containing no results (zero) are highlighted in green.
- Calculations that failed, producing an error, have red shading.

Click on a result to open the rebate. This takes you to the results screen for that rebate. From there select a calculation to view the transactions for that rebate.
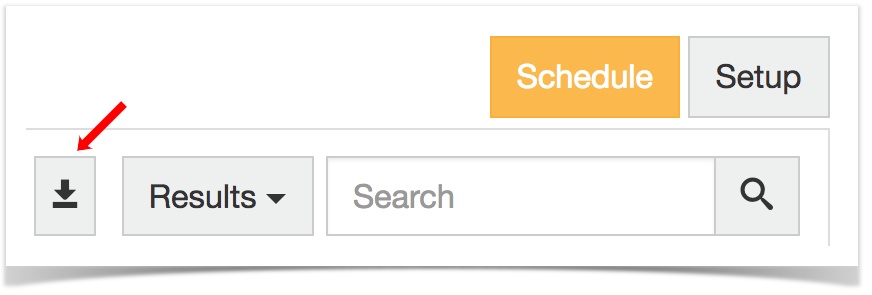
Export results
You can export project calculation results as a csv or xlsx file, in order to import rebate results into your ERP or invoice system. Both unposted and posted results can be exported.
Running a calculation from an individual rebate screen
- Click Calculate.
- Follow the same steps as described above.
Viewing results
- Once the calculation is completed, the dialog closes and the Results tab for the rebate opens (filtered by unposted). You also see a success or failure message.
- Select a calculation to view the transactions for that rebate.
What you can do from the results screen
Filter
- Filter by unposted and posted
- Filter according to calculation outcome
Select, copy and paste cells
- select cells to view count, sum and average (this will appear below the grid).
- copy cell data and paste into an external application, e.g., Excel.
Delete
- select and delete unposted transactions.
- select and delete posted transactions.
Post
- post transactions (see section below)
View more detail
- click on a name to open a detailed view of transactions. Transactions are sorted by date and then by value/quantity. In the image below, the user has scrolled across to see more information. In this view you can also select calls to view count, sum and average.
![]()
Posting transactions
Posting commits transactions to the analysis database. Select a rebate and click Post.
Rebates relating to posted transactions can't be edited or deleted. You can, however, still change whether a rebate is active or inactive as this can be useful for filtering.
Scheduled calculations
Schedule rebates to calculate when source data updates
You can schedule non-parent rebates within a project to calculate as soon as the project's source database is updated. This allows you to gain visibility of rebate estimates as soon as a month has ended, as databases are typically updated (or 'rebuilt') at the end of each month.
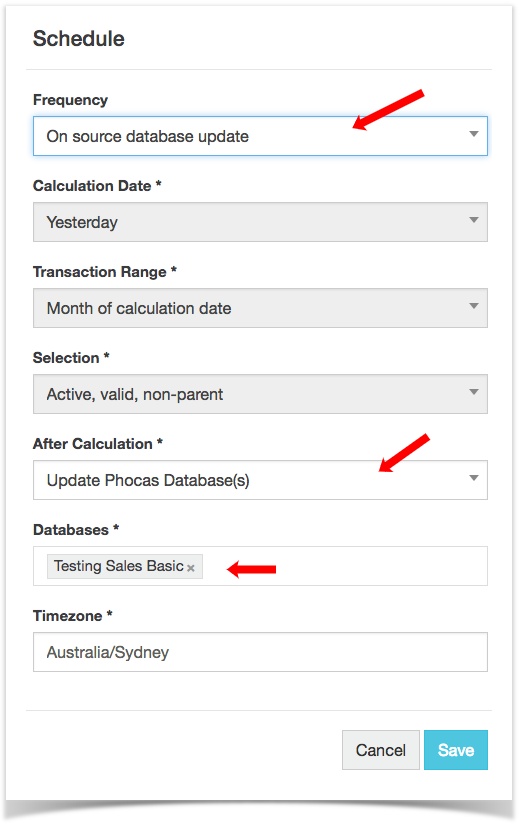
- To do this, go to the projects home screen and select the required project. Choose Schedule.

- Under Frequency, select 'On source database update'.
- There are several non-editable fields:
- Calculation date. This defaults to 'yesterday'. You can change the timezone to suit the timezone of the consumer of the calculation information (e.g., to account for them behind behind or ahead of your local timezone).
- Transaction range. This refers to the full calendar month in which 'yesterday' falls (e.g. if today is November 1, the calculation date is October 31st and the 'transaction range' is the month of October).
Selection. Any active, non-parent rebates in the project are included in the calculation.
Timezone defaults to your timezone, but can be changed depending on the timezone of colleagues or other end users who need the calculation information. Note that changing this only affects the calculation schedule for the particular project. It does not affect your default timezone or anything else in Rebates or Phocas.

To remove the schedule, change Frequency to be blank.
Trigger database update following a successful calculation
To keep your Rebates analysis database up to date you can set a scheduled calculation to also trigger a build on selected Phocas databases. Once the calculation has run successfully, the analysis database/s will update.
This option can only be applied to databases other than the project source databases, and only to databases without a build schedule.
To do this:
- Select the calculation frequency.
- Under the 'After calculation' heading choose 'Update Phocas' databases(s) from the dropdown.
- Select databases you want to update. You can add multiple databases or just one.
Alternatively, you leave the 'After calculation' field set to the default 'Do nothing' option.
You can edit this later from the Schedule button on the project home screen.
Delete a rebate
- From the Rebates tab, highlight a rebate and select delete.
- You will be asked to confirm if you want to delete the rebate. This action cannot be reversed. You can only delete one rebate at a time.
- If a rebate has posted transactions you won't be able to delete it. However; you can set it as 'inactive', which means it won't be included in calculations.
- Deleting a parent rebate also deletes all associated child rebates. If you select a parent rebate and choose Delete you will get a warning. If you proceed, the deletion can not be undone.
Using groups to manage rebates
Rebates within a project can be categorised into groups, which is useful for filtering both within the Rebates solution itself and once you go into Phocas to analyse your rebates. Grouping doesn't affect the setup or calculation of a rebate; it is just a way of categorising, e.g., groups for marketing campaigns, product launches, buying groups, etc.
Groups are created and managed in the project setup screen. Any groups created here will appear for selection when you are creating a rebate.
Create a group
Edit or delete a group
Select a row to delete a group or to edit the description.
Add a comment to a rebate
To comment on a rebate, or view a comment added by another Rebates user, select the Comments tab.
Write your comment and choose the tick to save it before leaving the screen. Note that comments can't be edited or deleted.
Analyse rebates data in Phocas
As long as you have a 'rebates analysis' database in Phocas you can easily view rebates by various categories, eg by customer, region, etc.
The dashboard below gives a snapshot (left to right) of how often rebates are paid overall, a year-on-year variance in rebates to a particular customer and a comparison of total rebates with those that are percentage-based. This information comes from a rebates analysis database. See Dashboards.
Accessing your Rebates analysis database
As long as your administrator has given you access to a rebates analysis database (containing your rebates information, fed back into Phocas), simply open Phocas as you normally would. If there is a Rebates analysis database it will appear on your home page or list of databases.
You will typically have rebates-specific data streams, such as posted and unposted rebates, and measures such as total rebate, percentage, fixed, etc.
Export Rebates data from Phocas
Once in Phocas, you can export Rebates data to a spreadsheet, print, etc.