Versions Compared
| Version | Old Version 26 | New Version Current |
|---|---|---|
| Changes made by | ||
| Saved on |
Key
- This line was added.
- This line was removed.
- Formatting was changed.
| Info |
|---|
The information on this page applies to budget owners and administrators only. |
As the budget owner, your name displays as the baseline in the workflow for all budget rows in the worksheet, which means that the workflow starts and stops with you.
As illustrated in the diagram below, you assign tasks (budget rows) to other users and when they complete those tasks, they submit the rows back to you. You can then review those rows and either accept or reject them. When you believe there is no more work to do for the rows, you can mark them as complete.
 Image Removed
 Image Added
Preparing the budget or forecast is a collaborative process but you can have peace of mind of knowing that while multiple users can work in the budget workbook a worksheet at any time, only the current workflow owner of a row can enter or edit data in that row.
| Tip |
|---|
To help you manage the workflow process, add administrators to the budget workbook. Administrators can also take over the workflow in your absence. |
Assign tasks
You can assign tasks individually, one row at a time, or assign multiple tasks simultaneously. Assignees (workflow contributors) will see a pink notification on their Phocas homepage next to the relevant workbook, with a number indicating how many tasks they have. You can also enable email workflow notifications, so assignees get an email informing them they have tasks to complete.
Assign
aone task to a user
In the Workflow column of a row (or row within a selection of rows), click the workflow status button (it will display as Baseline initially).
In the workflow window, enter a comment, if required.
Click the Assign button and select the required user.
The workflow window closes instantly and the Workflow column updates to reflect your changes - the label on the Baseline button changes to Assigned and your name is replaced by the user you assigned the task to. Your initials (predecessor identifier) remain, so other users can see who assigned the task.
If you change your mind, make a mistake or want to edit the
values in the row yourself, you can unassign the user from the row. Click the Assigned button, then click Unassign. The row returns to you and the other user loses the ability to edit the data.
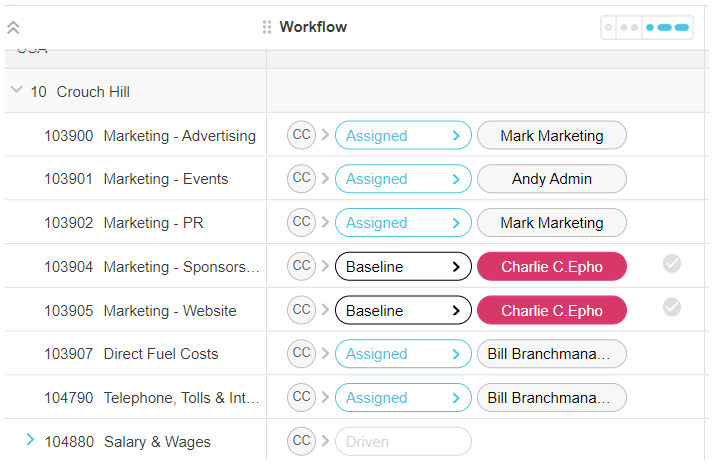
For example, in the image below, you can see that the budget owner Charlie C.Epho assigned some of the Marketing rows to Mark Marketing and Andy Admin, and the Direct Fuel and Telephone rows to Bill Branchmanager. Charlie remains as the baseline for the remaining Marketing rows, as she didn’t assign them to anyone else. She could not assign the Salary & Wages row to any user, as it is being driven (by the Headcount driver tab).
 Image Removed
 Image Added
Assign multiple tasks to a user simultaneously
You can multi-select ‘like’ rows, whichThere are several ways to assign tasks in bulk:
Update all rows with a specific workflow status: With no rows selected, click the Row menu > Select all rows with workflow status, then select the applicable status. With those rows now selected, click the Row menu again and select Update workflow status, then change the status as usual. The workflow status of all the selected rows is automatically updated.
 Image Added
Select an entire level (hierarchy) in order to manage workflows. For example, you might want to select all baseline rows to assign them to a particular user or select all rows with Rejected status for closer inspection.
 Image Added
| Expand | ||
|---|---|---|
| ||
|
Manually multi-select like (similar)rows. These are rows that have the same resulting action, for example, all rows you want to assign to a particular user. These rows can contain a mix of predecessors, owners, and actions. The first row you select determines which other rows can be selected. The
like rows become available for selection via their
checkboxes. As
unlike rows cannot be selected, their
checkboxes do not display. When you make a selection, you can
proceed in two ways:
Use the Row menu to take further action with those selected rows.
 Image Added
Click on any row in that selection to proceed with assigning the rows.
| Expand | ||
|---|---|---|
|
|
| ||
|
| Html macro |
|---|
<div class="wistia_responsive_padding" style="padding:56.25% 0 0 0;position:relative;"><div class="wistia_responsive_wrapper" style="height:100%;left:0;position:absolute;top:0;width:100%;"><iframe src="https://fast.wistia.net/embed/iframe/rtmjzzokml?seo=false&videoFoam=true" title="MultiSelectLine Video" allow="autoplay; fullscreen" allowtransparency="true" frameborder="0" scrolling="no" class="wistia_embed" name="wistia_embed" msallowfullscreen width="100%" height="100%"></iframe></div></div>
<script src="https://fast.wistia.net/assets/external/E-v1.js" async></script> |
| .mp4 |
Review completed tasks
When users complete their tasks, they might assign the rows to other users for their input or submit the rows straight back to you. Ultimately, as the budget owner, the rows end up back with you.
When a user submits a task, a notification displays in the Tasks button in the top right corner. In the image below, Charlie was notified about two tasks and when he clicked the Tasks button he could see they were two rows submitted by Bill Branchmanager.
 Image Removed
You can either click a task summary to go straight to the corresponding row in the budget worksheet, which displays in blue, or click the My tasks button in the search box to filter the budget worksheet and view only the rows that were submitted or assigned to you.
 Image Removed
 Image Added
Review the budget values that were completed by the user and read any comments that were added against the cells. You can also review the workflow comments and workflow history, to see how the row progressed from the baseline to being a fully completed budget or forecast line item.
Accept or reject rows
If you are satisfied with a row, you can accept it.
If you are not satisfied with the row, you can make your own revisions, then accept the row, or reject the row and send it back to the user for further editing. The workflow continues until you finally accept the row.
You can also accept or reject rows in bulk (read more about this in the Assigned tasks section above).
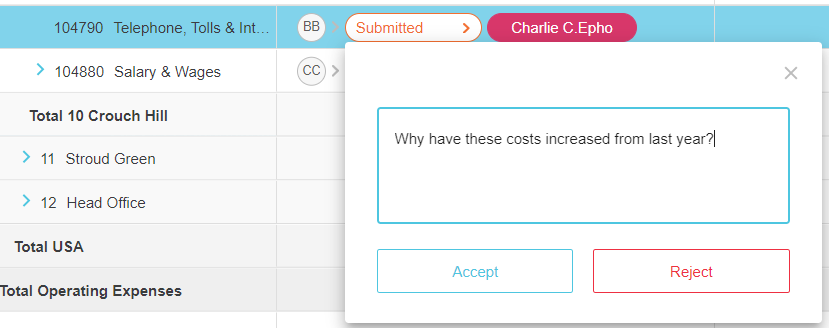
In the Workflow column of a row (or row within a selection), click the Submitted button.
In the workflow window, enter a comment, if required.
Click Accept or Reject, as applicable.
 Image Removed
 Image Added
| Tip |
|---|
When you accept a row, you can mark the row as complete, as a personal reminder that you have reviewed and accepted the budget values. |
Mark a row as completed
The Completed status in the workflow is for reference purposes; it is simply a note to the budget owner that the data entry for the row is complete and has been reviewed. You do not need to mark every row as 'completed’ before you can publish or use the budget workbookor forecast. You can use this status as a reminder to you that you have reviewed the row and are comfortable with it.
When the workflow is back with you, you can mark the row(s) as complete in two ways:
Individual row: Click the Mark as Complete button
 .Click or click the Accepted button, enter a comment , if required, and click Complete.
Multiple rows in bulk: Select the applicable rows, then click the Row menu > Mark as complete.
 Image Added
Either way, the Workflow column updates to reflect your changes - the green Completed button ![]() displays and your name no longer displays, indicating that the workflow has stopped.
displays and your name no longer displays, indicating that the workflow has stopped.
 Image Removed
 Image Added
| Tip |
|---|
To save time, you can select multiple rows and mark one of them as complete - all of the selected rows will display as completed. |
If you need to undo this action and reopen the row in the workflow, click the Completed button ![]() button. You can also use the Row menu to select all rows with the workflow status of Completed, then update the status as required.
button. You can also use the Row menu to select all rows with the workflow status of Completed, then update the status as required.
Take over the workflow
If you are a budget administrator, you can take over the ownership of the workflow from the budget owner by assigning yourself a row. This action is recorded in the workflow history. You can then assign the row to someone else or submit it back to the budget owner. This option is useful when the budget owner is unavailable, and the workflow is at a standstill.
In the Workflow column of a row (or row within a selection of rows), click the workflow status button and click Self Assign.
Revert to baseline
You can undo all of the changes that were made in the workflow for a row, so you can start the process again. See Revert to the baseline values.
On this page
| Table of Contents | ||
|---|---|---|
|
Related pages
Video from the Phocas Academy
/ifr